
There are several possibilities to create a View in Aquabase:
1.) Under Edit|Create View: Create a SQL query returning a SITE_ID_NR result set
2.) Under Edit|Select Sites: Select sites (SITE_ID_NRs) from a list
3.) Mark sites on any entry form by pressing CTRL-M while on a site of interest
The first option requires some knowledge of SQL but Aquabase does most of the query setup for you and if you only select from the 4 list boxes at the top there is almost no typing to be done, with the exception of the actual WHERE condition that you want to restrict the data to, e.g. a water level deeper than 50m or an EC > 200 or any other condition…these values have to be typed in.
So:
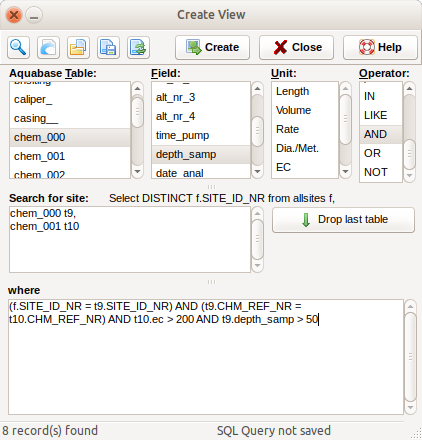
1.) Select the Aquabase Table by double-clicking on it…this will insert the table under the “Search for site” box, which has the beginning of the SQL query just above it. A relationship between the selected table and the “allsites” view will then automatically be set up in the “where” box, followed by the “AND”, which you will now have to complete. All tables will be “aliased”, e.g. t3 for the 3rd table, to improve readability and shorten the query.
2.) For the completion of the query select the field from the “Field” list box (double-click), which you want to use for condition (e.g. WATER_LEV)
3.) Then select the Operator from the last list box
4.) Type in the value: If the value is numeric just type the value, e.g. 200. If the value is a string (characters) then use single or double quotes, e.g. ‘B’ or ‘GRANITE’. If the value is a date or time then also use quotes, e.g. ‘20120601’ or ‘1345’.
There can be as many conditions as you like, but you have to make sure that you select all tables for which you want to use conditions first to set up the correct relationships and then add the conditions to the end of the statement in the box.
Examples of the “WHERE” condition:
-basicinf table (t3) selected:
(f.SITE_ID_NR = t3.SITE_ID_NR) AND t3.SITE_TYPE = ‘B’
-geology_ table (t28) selected:
(f.SITE_ID_NR = t28.SITE_ID_NR) AND t28.LITH_CODE = ‘GRNT’
-waterlev table (t79) selected:
(f.SITE_ID_NR = t79.SITE_ID_NR) AND t79.WATER_LEV > 100
AND t79.DATE_MEAS >= ‘20100101’
The chemistry queries are a bit more complicated, but again, relationshpis will be set up automatically:
- chem_001 selected, this will also select chem_000 automatically
(f.SITE_ID_NR = t9.SITE_ID_NR) AND (t9.CHM_REF_NR =
t10.CHM_REF_NR) AND t10.EC > 200
One could add:
AND t9.DEPTH_SAMP > 50
and the query will return all sites where the EC was > 200 and the depth sampled was > 50.
Clicking the “Create” button will then ask you to provide a name for the new View. The name should be descriptive so that users know what the view will do. Aquabase will automatically change invalid characters used in the View name to _ (underscore) or e.g. “gt” for > etc.
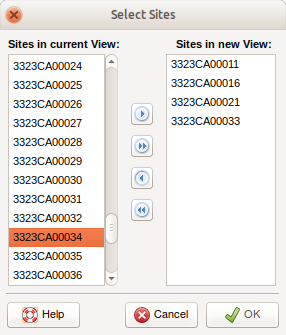
The second option for creating views is by selecting sites from a list. Open the Edit|Select Sites dialog and select sites on the left list and using the buttons to move them to the right list (or other way round) or just double-click on the sites you want to move.
Once done click on “OK” and provide a view name. This will create a view with all the sites contained in the list box on the right.
The third option for creating views is by marking sites on any of the entry forms by pressing CTRL-M. This will create a list of marked sites, which are indicated by an asterisk (*) behind the site identifier in the status bar. Under the menu item Edit|Mark Sites|Create View from marked sites you will be asked to provide a view name again.