
The “Run SQL Query” tool is a powerful tool to execute SQL queries on any of the Aquabase tables and then exporting the data into a variety of formats.
The set-up of the queries can be achieved by selecting objects (double-click) from the relevant listboxes above the actual query field. But the query can also be typed in directly or pasted into the query field, but also loaded with the “Open Query File” button.
The “Save Query Results to File” button then allows the export of data, where you can choose the file format, but also the columns to be exported and a few other options. The “Open Notepad” button only becomes active when there are BLOB/MEMO fields in the returned dataset and allows viewing of the data in those fields.
There are almost no restrictions to what can be used in the query and the “Statement” listbox might not even have a complete set of statements available. As long as you comply with standard SQL language the queries will work for most of the supported databases.
So a simple query could be:
SELECT * FROM basicinf t5
where all columns (the *) from the “basicinf” table and all records would be selected. The t5 is an alias for the “basicinf” table which makes the query shorter and easier to read further down:
SELECT * FROM basicinf t5 WHERE t5.DEPTH > 100
would then return a result of only the records where the depth (t5.DEPTH field) is greater than 100m. In this case t5 stands for basicinf so in the long version one could write basicinf.DEPTH. This is not required when only working with one table but becomes important when using information from more than one table and selecting only the fields you want:
SELECT t5.SITE_ID_NR, t5.NR_ON_MAP, t5.SITE_NAME, t5.Y_COORD, t5.X_COORD, t87.WATER_LEV FROM basicinf t5
INNER JOIN waterlev t87 ON (t87.SITE_ID_NR = t5.SITE_ID_NR )
WHERE t87.LEVEL_STAT = ‘S’
would return 5 columns from the “basicinf” table and 1 column from the “waterlev” table, but only the records where the water level status is static (LEVEL_STAT = ‘S’). The S needs to be in single or double quotes as the field is a character field! The tables have to be joined in order to display columns from both: The INNER JOIN or simply JOIN will return all records where there are actually static water level records in the database…so sites where there is no static water level record will not be returned! But this would also duplicate returned information where there are more than one static water level at the same site! This can be avoided by using e.g. the date or any other field to filter the returned dataset or even only using the latest static water level.
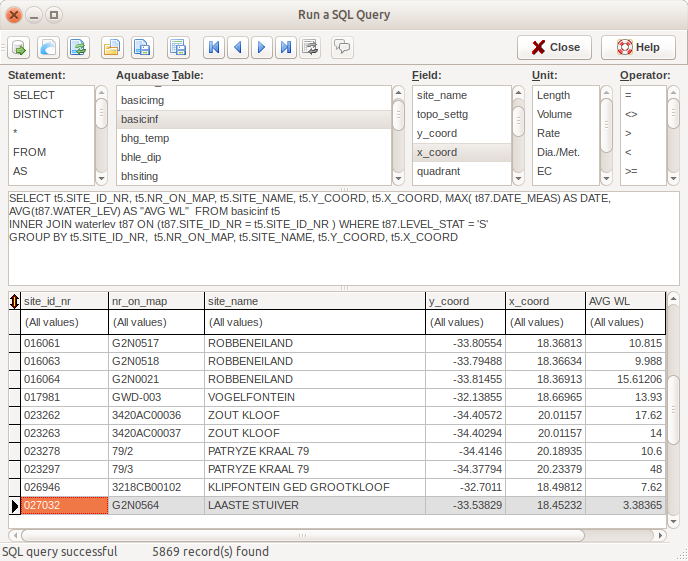
SELECT t5.SITE_ID_NR, t5.NR_ON_MAP, t5.SITE_NAME, t5.Y_COORD, t5.X_COORD, MAX( t87.DATE_MEAS) AS DATE, t87.WATER_LEV FROM basicinf t5
INNER JOIN waterlev t87 ON (t87.SITE_ID_NR = t5.SITE_ID_NR ) WHERE t87.LEVEL_STAT = ‘S’
GROUP BY t5.SITE_ID_NR
therefore also returns the maximum date measured (MAX( t87.DATE_MEAS) and the column is displayed as “DATE”, but one has to group the sites by the SITE_ID_NR (GROUP BY t5.SITE_ID_NR) so that the query knows which maximum to use: create the maximum for each same SITE_ID_NR.
The LEFT JOIN would, however, return all sites, even those where there is no static water level and may be useful if you want to show all sites, even those without static water levels.
Views are treated like tables in SQL and can further be used to restrict the returned dataset.
You may want to visit https://www.tutorialspoint.com/sql/ for an in-depth tutorial on using SQL.
If you are working in units different from the SI units (e.g. ft or m3/d etc.) then double-clicking an item in the Unit list box will insert the relevant factor into the query.
BUT: You can also use the Visual Query Builder (QBuilder), which is a “plugin” compiled into Aquabase and is accessible from the “Tools” menu. The tool was developed by Sergey Orlik and FastReports and is open-source Pascal code, but is not under active development. More information can be found at http://fast-report.com/en/qbuilder.php.
QBuilder has no Help function, but is pretty self-explanatory: Drag tables into the “Model” window and link them by dragging the common fields (e.g. SITE_ID_NR) onto each other. Then create a SQL by clicking the relevant button and run the query to get the results in a grid. The results in the grid can then be exported in the same way as in the “SQL Query Tool”.
